Installing a dash cam without using the cigarette lighter is possible by hardwiring it to your vehicle’s fuse box or connecting it to a USB power source. This method keeps your dashboard clean, frees up the power outlet, and allows for a more permanent and reliable power connection.
If you’ve ever wanted a cleaner, more professional-looking setup in your car, learning how to install a dash cam without a cigarette lighter is a game-changer. I’ve spent years tinkering with car electronics, from setting up GPS trackers to installing multiple cameras, and I can tell you firsthand that hardwiring a dash cam is one of the best upgrades you can do. It’s not just about looks, it’s about reliability, constant power, and making sure your camera is always ready when you need it most. In this guide, I’ll walk you through everything I’ve learned, including the tools you need, the step-by-step process, and the mistakes to avoid so you can do it right the first time.
Why You Should Consider Hardwiring Your Dash Cam
Hardwiring your dash cam is more than just a neat trick. It’s a smart move for anyone who wants better performance and peace of mind.
Always-On Power Supply
When you hardwire a dash cam, it draws power directly from your car’s electrical system. This means your camera can run even when the engine is off, which is perfect for parking mode. I’ve personally used this feature to catch a hit-and-run in a parking lot, and it saved me a lot of hassle with insurance.
Frees Up Your Cigarette Lighter
Let’s be honest, the cigarette lighter socket is one of the most useful ports in your car. By hardwiring your dash cam, you free it up for other things like charging your phone, powering a GPS, or running a portable cooler.
Cleaner and Safer Installation
Loose wires hanging from your dash are not only unsightly but can also be a safety hazard. Hardwiring keeps everything tucked away and out of sight, giving your car a clean, factory-installed look.
Longer Battery Life for Your Devices
When you use the cigarette lighter, your dash cam often charges your phone or other devices slowly. Hardwiring allows your camera to operate independently, which means your other gadgets can charge faster and more efficiently.

Tools and Materials You’ll Need
Before you start, gather everything you need. Trust me, having the right tools makes the job ten times easier.
Essential Tools
- Dash cam hardwire kit (make sure it matches your camera’s voltage requirements)
- Fuse tap or add-a-circuit kit
- Automotive fuse puller
- Wire crimper or stripper
- Multimeter (to identify fuse box connections)
- Zip ties or adhesive cable clips
- Trim removal tool (plastic pry tool)
- Electrical tape
Optional but Helpful
- Soldering iron (for a more secure connection)
- Heat shrink tubing
- A small flashlight
- Owner’s manual (to locate the fuse box)

Step-by-Step Guide: How to Install a Dash Cam Without Cigarette Lighter
Now let’s get into the actual installation. I’ve done this several times, and I’ll break it down so even a beginner can follow along.
Step 1: Plan Your Dash Cam Placement
Decide where you want to mount your dash cam. Most people place it behind the rearview mirror, which keeps it out of your line of sight. Make sure the camera has a clear view of the road and doesn’t obstruct your vision.
Step 2: Locate Your Car’s Fuse Box
Your fuse box is usually located under the dashboard on the driver’s side, in the glove compartment, or under the hood. Check your owner’s manual if you’re unsure. I’ve found that most modern cars have an interior fuse box that’s easy to access.
Step 3: Identify a Constant and a Switched Power Source
You’ll need two types of power sources:
- Constant power (always on, even when the car is off) for parking mode
- Switched power (only on when the ignition is on) for normal recording
Use a multimeter to test the fuses. Turn off the car and find a fuse that still has power for constant, and turn on the car to find a fuse that only works when the ignition is on.
Step 4: Connect the Hardwire Kit to the Fuse Box
Use a fuse tap to connect the hardwire kit to the fuse box. Simply remove the existing fuse, insert it into the fuse tap, and plug the tap into the fuse slot. The hardwire kit will have three wires: ground, constant, and switched. Connect them according to the instructions.
Step 5: Ground the Wire
Find a metal bolt or screw near the fuse box and attach the ground wire. Make sure it’s a clean, bare metal surface for a good connection. I usually scrape off a little paint to ensure a solid ground.
Step 6: Route the Cables
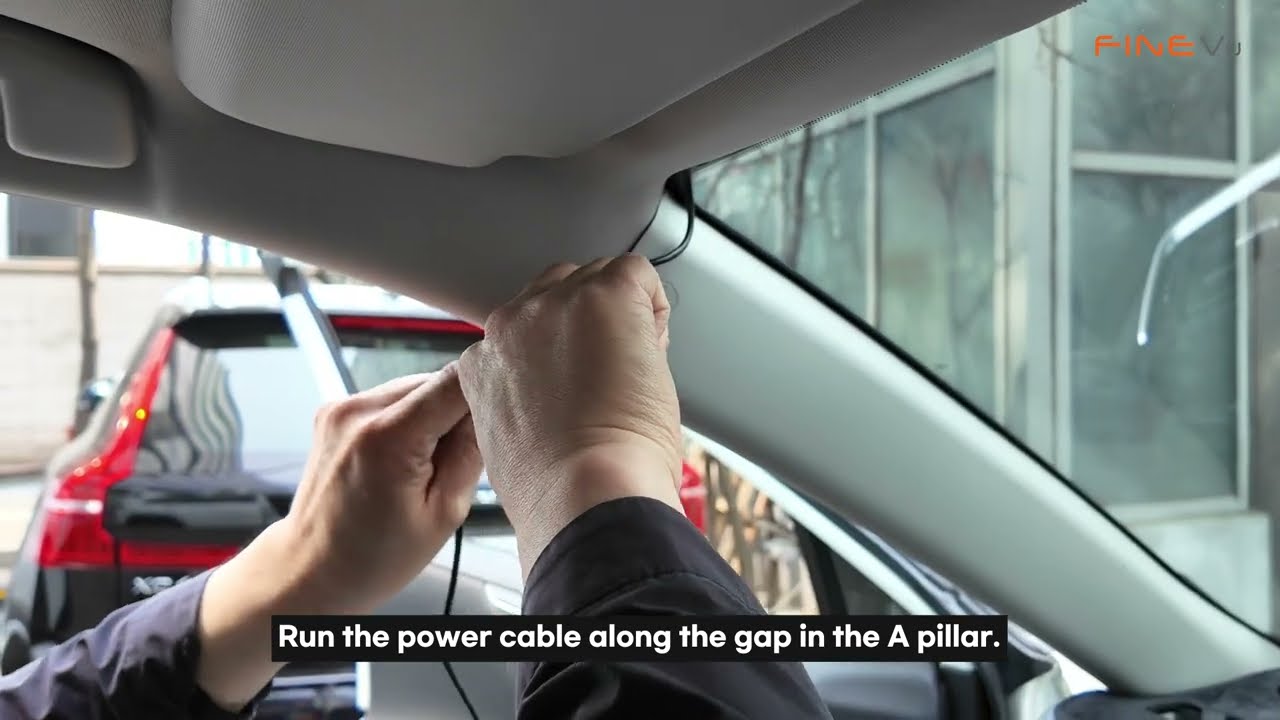
Carefully tuck the cables along the headliner, down the A-pillar, and into the fuse box area. Use a trim removal tool to gently pry open the panels and hide the wires. This step takes a little patience, but it makes a huge difference in the final look.
Step 7: Test the Installation
Before you put everything back together, test the dash cam. Turn on the car and see if it powers up. Then turn off the car and check if the parking mode works. If everything checks out, you’re good to go.
Step 8: Secure All Loose Wires
Use zip ties or adhesive clips to secure any loose wires. This prevents rattling and keeps your installation looking professional.

Common Mistakes to Avoid When Hardwiring a Dash Cam
I’ve made a few mistakes myself, so here’s what to watch out for.
Using the Wrong Fuse
Don’t use a fuse that controls critical systems like airbags or the engine control unit. Stick to non-essential circuits like the radio or interior lights.
Skipping the Multimeter
Always test the fuse with a multimeter. Guessing can lead to a dead battery or a non-functional dash cam.
Poor Ground Connection
A bad ground can cause your dash cam to reset randomly or not work at all. Make sure the ground wire is tightly secured to bare metal.
Overlooking the Battery Drain
If you use constant power, your dash cam can drain your car battery over time. Consider using a dash cam battery pack or a hardwire kit with a voltage cutoff to prevent this.
Routing Wires Incorrectly
Avoid routing wires near airbags or moving parts. The last thing you want is a wire interfering with your car’s safety systems.

Safety Tips for a Smooth Installation
Safety should always come first when working with your car’s electrical system.
Disconnect the Battery
Before you start, disconnect the negative terminal of your car battery. This prevents any short circuits or electrical shocks.
Double-Check Your Connections
Make sure every connection is secure. Loose connections can cause power interruptions or even damage your dash cam.
Follow the Dash Cam Manual
Every dash cam is different. Read the manual to understand the power requirements and installation process for your specific model.
Don’t Rush
Take your time. Rushing can lead to mistakes that are hard to fix later. I’ve learned that patience is the key to a clean and reliable installation.

Benefits of Hardwiring vs. Using the Cigarette Lighter
Let’s compare the two methods so you can see why hardwiring is the better choice for most people.
Reliability
Hardwiring provides a stable power supply, while cigarette lighter connections can be loose or unreliable, especially on bumpy roads.
Aesthetics
Hardwiring keeps your dashboard clean and clutter-free, while cigarette lighter setups often have visible wires hanging down.
Functionality
Hardwiring allows for parking mode, which the cigarette lighter usually doesn’t support unless your car has an always-on socket.
Convenience
Once hardwired, you don’t have to think about plugging in your dash cam every time you drive. It just works.
Frequently Asked Questions
Can I install a dash cam without a cigarette lighter?
Yes, you can install a dash cam without a cigarette lighter by hardwiring it to your car’s fuse box or connecting it to a USB power source. This provides a cleaner, more permanent installation.
Will hardwiring a dash cam drain my car battery?
It can if you use constant power without a voltage cutoff. To prevent this, use a hardwire kit with a low-voltage protection feature or install an external battery pack.
Is it safe to hardwire a dash cam myself?
If you have basic knowledge of car electronics and follow safety precautions, it is safe. However, if you’re unsure, it’s best to have a professional install it for you.
Do I need a special kit to hardwire a dash cam?
Yes, you’ll need a dash cam hardwire kit that matches your camera’s voltage requirements. These kits are widely available and usually come with detailed instructions.
Can I use a USB port instead of the cigarette lighter?
If your dash cam supports USB power, you can connect it to a USB port in your car. However, this may not support parking mode, depending on your vehicle’s USB power settings.
Final Thoughts
Hardwiring a dash cam without using the cigarette lighter is one of the best upgrades you can make for your vehicle. It not only gives you a cleaner look but also unlocks features like parking mode and ensures your camera is always ready to go. From my own experience, the process is straightforward if you take your time, use the right tools, and follow the steps carefully. The first time I did it, I was nervous about messing with my car’s electrical system, but once I saw the results, I was hooked. Now, every car I own has a hardwired dash cam.
If you’re ready to take the next step, grab a hardwire kit, set aside a couple of hours, and give it a try. You’ll be surprised at how easy it is, and you’ll love the clean, professional result. And if you have any questions or want to share your own installation tips, drop a comment below. I’d love to hear how it went for you. Safe driving, and happy recording.